Contents
Aim of the Pathological Examination
The central purpose of the pathological examination of a skin specimen is to determine the nature of the lesion. For inflammatory diseases, this is the sole aim of the process. However, in the case of tumours, the status of the excision margins is also important. Nevertheless, this requires that the specimen which has been submitted is suitable for evaluation of the margins. For specimens such as incisional biopsies, many curettages, shaves or punch biopsies assessment of the margins is intrinsically not possible.
Small and Medium Sized Excisions
Small and medium sized excision specimens are major components of a skin cut up. The excision form of surgery is employed for many skin tumours, particularly if the tumour is considered clinically to be malignant or suspicious, because the specimen allows the margins to be evaluated properly. Excisions are employed for basal cell carcinomas, squamous cell carcinomas, melanomas, suspicious melanocytic lesions and masses of unknown clinical nature. Clinically benign naevi may also be removed as a formal excision.
The description of a skin ellipse is fairly short. The ellipse should be measured in three dimensions, indicating which of these is the depth. The size of any lesion should be given. If the lesion is flat, only two dimensions of it are necessary. If the lesion is raised, three dimensions should be measured. The distance of the lesion from the nearest peripheral margin should be stated. It can also be helpful to indicate the distance to the nearer pole. The appearance of the lesion should be stated, with attention paid to any second lesions or variations in the main lesion. The cut surfaces should also be inspected.
The basic approach to these skin excision specimens is to slice them perpendicular to the long axis of the specimen ("bread slicing"). This will generate en face margins for the poles of the ellipse and cruciate margins for the sides of the ellipse (see the section on
margins for further details). The manner in which the ellipse is cut will mean that the polar margins are usually further from the tumour than the peripheral margin in the plane of section, hence the mixed use of cruciates and en face margins. The deep margin is also assessed by cruciate margins. The margin should be inked before slicing.
|
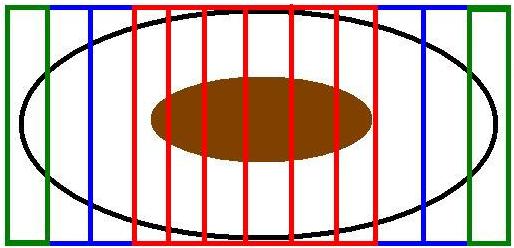
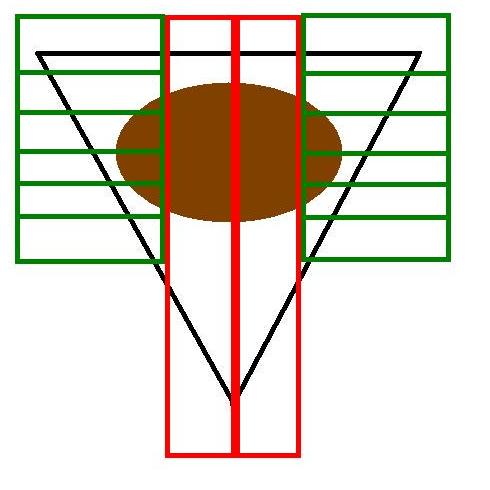
The diagram illustrates the basic bread slice technique. The en face margins are shown in green. The blocks in red contain the tumour and the cruciate distance to the associated peripheral margin. The blue blocks represent the flanking blocks to the tumour that would confirm or refute the macroscopic impression of the extent of the tumour in the direction of the poles of the ellipse.
|
Transverse slicing the ellipse in this way will yield full cross sections of the lesion. If several such slices of the lesion are obtained, the amount of information upon which to base a diagnosis is increased.
For pigmented lesions, nominating the blocks which contain the lesion for levels at the time of cut up may be helpful. Melanocytic tumours often require levels in order to enable a reliable diagnosis to be made.
It is usually possible to fit at least one transverse slice of small and medium sized ellipses into a single cassette. Sometimes the slice may need to be bisected and the block key should state this. Normally, no more than two or three slices should be placed into one cassette. This limitation facilitates embedding, the generation of full face sections of all slices and the production of levels if desired.
Added complexity can be given to the specimen by the use of an orientation suture. This suture is usually placed at the pole or the midpoint of one side of the ellipse. It is typically designated as 12 o'clock but may sometimes be referred to as 'superior' or 'proximal'. If either of these anatomical terms is employed, it is safer to refer to the suture as 12 o'clock in the macroscopic description, rather than attempt orientation at cut up; formal orientation can be done later if necessary but it is not worth risking misorientating with regard to anatomical planes during a busy cut up. Under such circumstances, the description should contain a phrase along the lines of
'An orientating suture is present at one pole of the ellipse and for descriptive purposes will be referred to as 12 o'clock'.
Sometimes the suture will be stated by the clinician as being at 3, 6 or 9 o'clock. This does not cause problems, provided that further references to clock face positions in the macroscopic description are consistent with this designation.
Occasionally, the suture will be stated as being distal or inferior. This can be converted to 6 o'clock.
Rarely, the suture is communicated to be medial or lateral. Under these circumstances it is prudent to orientate the specimen carefully with regard to the patient's anatomy and then use the clock face designation or either 3 o'clock or 9 o'clock for the suture.
If the specimen has been orientated, the peripheral margins should be inked in different colours with the intention of cutting the specimen such that each slice has one colour on one perpheral margin and the other colour on the opposite.

|
|
|
The diagram shows an ellipse of skin that is orientated by purple a suture attached to the upper pole (12 o'clock). The green and blue hemi-ellipses indicate how the specimen should be inked to preserve the orientation. An example block is shown in red. The specimen would be bread sliced so that all blocks are cut parallel to this plane.
|
This diagram shows a cross section of the same specimen if a cut was made where the red block was shown in the left hand diagram. The sutured pole of the ellipse has been left attached for context. The cross section of the ellipse contains both the 3 o'clock (green) and 12 o'clock (blue) margins, as well as the deep margin. In this example the green and blue ink have also been applied to the deep margin. The alternative approach is to use a third colour ink for the deep margin.
|
Determing the nature of the lesion is often regarded as taking priority over the margins. The significance of the status of the margins is only fully appreciated if the nature of the lesion is known. However, addressing both the nature of the tumour and its excision status are normally not mutually exclusive goals but this hierarchy should be borne in mind.
An example description of a skin specimen and its block key is as follows
The specimen comprises an ellipse of skin that measures 30x12mm to a depth of 7mm. An orientating suture is present at one pole of the ellipse. On the surface of the ellipse is an irregular lesion that has variable brown pigmentation. The lesion measures 11x9x3mm and is 2mm from the peripheral margin (3 o'clock) and 9mm from the nearer pole (12 o'clock) macroscopically. The 3 o'clock margin has been inked green and the 9 o'clock margin has been inked blue. Serially sliced and all embedded.
A1) 12 o'clock pole
A2-A7) Centre (lesion in A3-A6)
A8) 6 o'clock pole
Large Excisions
Large excisions are performed for tumours. The description of the specimen and the handling of orientating sutures is the same for a large ellipse as for a smaller one. However, it is not feasible to embed the whole of ellipse and instead the specimen must be sampled. This sampling follows the same principles as that for tumours in general and in this respect a skin ellipse can be considered to fall into the category of a
solid tumour .
The peripheral margins are usually taken first. These can either be cruciates from the 12, 3, 6 and 9 o'clock positions, cruciates from these positions plus the closest margin (if not one of these four points), or a more extensive sampling of each point on the clock from 12 through to 11 o'clock.
The tumour itself should be sliced transversely and sampled to ensure that the blocks demonstrate the nature of the tumour, its full thickness, its relationship to the adjacent skin and the status of the deep margin.
|
The diagram illustrates an example of a large ellipse of skin that has a suture at the 12 o'clock position. The standard 12, 3, 6 and 9 o'clock blocks are shown in green. The green block at 11 o'clock is the most important margin block because it includes the closest macroscopic approach of the tumour to the margin.
The blocks in red are examples of where the tumour could be sampled. The uppermost of the three rows of red blocks assumes that a slice of the tumour can fit into two cassettes; the bottom row shows an approach if the tumour required three cassettes for one transverse slice. The red blocks should be taken with the aim of including the deep margin in at least one of them. If the specimen is too thick to allow the surface and the deep margin to be included in the same cassette, specific blocks of the deep margin should be obtained.
|
Wedge Excisions
Wedge excisions are used on the external ear and (lower) eyelid and have unusual properties. They are frequently submitted as orientated specimens.
A wedge of the pinna will have skin on both sides and as such has no deep margin. Instead, the margins are the sides of the wedge and the point. Cartilage is also present in the specimen, although this seldom causes problems in physically cutting the specimen.
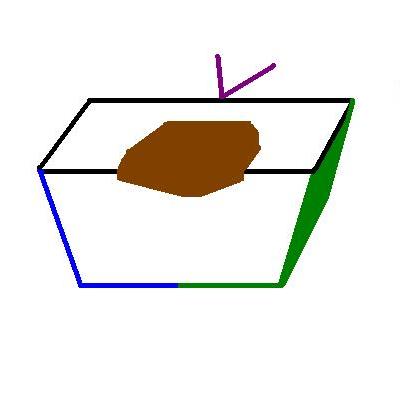
A wedge of the lower eyelid has a medial and lateral margin, an inferior margin and a deep margin. The superior aspect of the specimen is the junction of the skin with the conjuctiva and is not actually a margin but is instead just the surface of the skin.
A wedge of the pinna is cut up using a combination of breadslicing and cruciate sections. An eyelid specimen may be amenable to standard breadslicing or the pinna wedge method. If the pinna wedge technique is used, the skin-conjunctiva junction should be thought of as the base of the wedge.
|
|
|
|
The diagram shows a model of the cross section of a lower eyelid wedge. The surface of the skin is black. The conjuctiva is light blue. The margin is shown in yellow-green. The green bars indicate the distances from the tumour to the margins. The blue bar demonstrates the distance to the upper surface; this is not a margin.
|
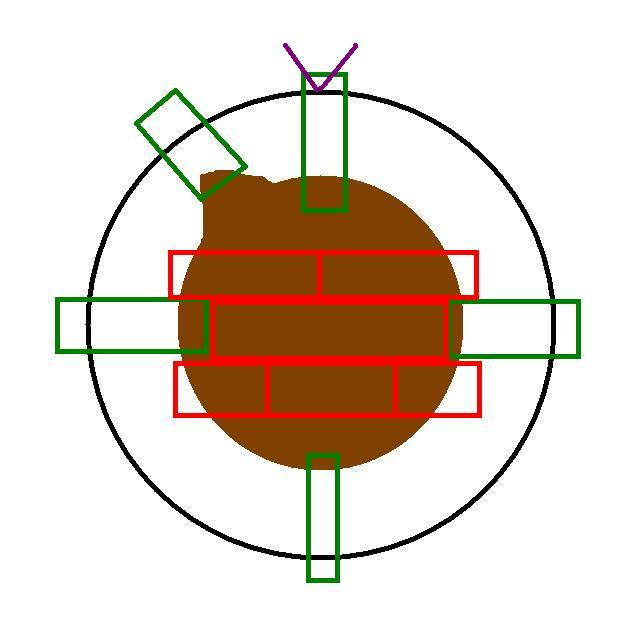
A basic wedge is shown in the diagram. The green blocks represent cruciate margins taken in the horizontal plane while the red blocks are cruciate margins in the perpendicular plane.
|
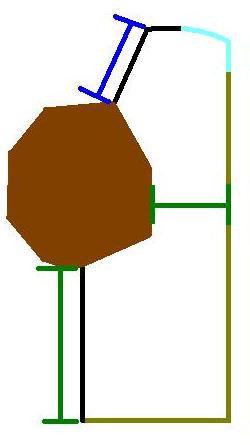
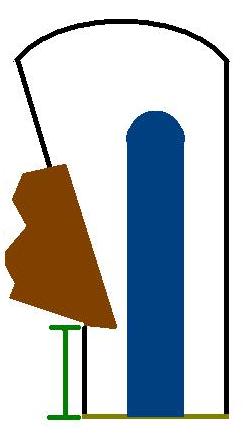
A wedge of pinna is similar to that of the lower eyelid. However, the surface is formed only by skin, without any other form of epithelium. A lobule of cartilage (depicted in blue) is present within the wedge. The green bar represents the only margin measurement that exists in this cross section
|
It is often prudent to ask the pathologist who will be reporting the specimen if they would like to see a wedge specimen before it is dissected.
Re-excisions of Melanoma Scars
The treatment of a melanoma involves the re-excision of the scar that resulted from the initial excision of the melanoma. This re-excision takes place even if the melanoma was completely excised with the first excision and is believed to improve the patient's prognosis.
Melanoma scar re-excisions are often large and embedding the whole specimen would generate a larger number of blocks than would be necessary. Instead, the specimen is usually sampled, although smaller ellipses can still be all embedded.
If the melanoma was previously completely excised, the specimen is serially sliced. If no focal lesions are identified other than the scar, three representative transverse slices of the scar are embedded (each slice may need to be divided into two or three cassettes).
If the melanoma was incompletely excised, more extensive sampling is essential. A small ellipse can again be embedded in its entirely. A larger ellipse requires embedding of the whole of the scar and the poles, preferably with the use of
flanking blocks. If residual melanoma is present, it will most likely be in the scar or in the immediately adjacent skin.
Melanoma scar re-excisions are sometimes orientated. Inking and handling of the orientation is the same as for other ellipses.
Re-excisions for Other Lesions
Sometimes a re-excision of a scar has to be performed for other lesions, such as a basal cell carcinoma or dysplastic naevus. These are generally handled as for a melanoma re-excision. However, the specimens are often smaller, so embedding the whole ellipse in possibly seven or fewer blocks is feasible. It should be noted that the previous specimen was often not a formal excision but a curettage, shave or punch biopsy. If this is the case, the re-excision should proceed on the basis that the tumour was previously incompletely excised.
Incisional Biopsies
An incisional biopsy is performed to ascertain the nature of a lesion without subjecting the patient to a larger excisional specimen. Incisional biopsies are employed for inflammatory rashes or sometimes for large tumours in which a large excision is not appropriate without at least first determining the nature of the tumour and whether excision can be avoided (for example a benign lesion in a person who has poor pre-existing health and who would require a long time to recover from a large excision and in whom a skin graft that could well be necessary to close the wound might be better managed by avoiding a complex excision).
The very nature of an incisional biopsy is such that comment on the margins is largely or completely irrelevant. However, the incisional biopsy will often include adjacent skin and may even be sutured to denote this. Inking the sutured end one colour and the non-sutured end another is prudent; if the tumour extends into macroscopically normal skin, the surgeon may need to increase the size of the excision to avoid cutting through covert tumour.
In terms of the actual cut up of the biopsy, the specimen is bisected parallel to the long axis. The halves can be embedded in one or two cassettes. Embedding in two cassettes doubles the amount of sections that can be produced for immunohistochemistry and also gives a safety net if some untoward event befalls the partner block.
Shave Specimen
A shave specimen involves shaving (or planing) the lesion off the surface of the skin. It is typically reserved for lesions that the clinicians are confident are benign. Such lesions are often removed for cosmetic reasons, or because they catch on clothes or are easily traumatised. Benign naevi are among the most commonly shaved specimens.
The specimen is usually a blob or a disc and can either be embedded whole or sliced perpendicular to the surface of the skin (or the deep margin) if apparent. Slicing provides sections that have the traditional orientation; embedding whole may cause problems with orientation. On the rare occasions when a seemingly clinically benign lesion transpires to be malignant, this preservation of the standard slice orientation can enable more prognostic information to be extracted.
Opinion varies as to whether the base of a shave should be inked.
Curettage Specimens
Curettage specimens are sometimes referred to as C+C, where the second C alludes to cautery. A small scoop-like device is used to scrape the lesion off the skin, or scrape out a superficial endophytic lesion. The base of the wound is then cauterised. Like the shave biopsy, this procedure is much quicker than a formal excision and is employed for benign lesions such as seborrhoeic keratoses. Basal cell carcinomas may be curetted. Curetted basal cell carcinomas seldom have a subsequent formal re-excision, presumably because it is assumed that the cautery will destroy any residual tumour and if it does not, formal excision can wait until recurrence develops.
A curettage may sometimes yield a blob or disc, which can be handled like a shave specimen. On other occasions the curettage generates multiple fragments which are usually only suitable to be embedded whole without further manipulation.
Punch Biopsies
Punch biopsies sample a lesion and are the specimen of choice in most inflammatory disorders. They are sometimes used for tumours in order to guide whether or not excision is necessary and if so how extensive that excision should be. A punch biopsy can be employed to remove a small naevus. However, unless the biopsy is sufficiently large to be cut like a small ellipse, it is not possible to assess the margins in all three perpendicular planes.
It may be possible to divide a punch biopsy of a small focal lesion into two. This division should not be through the lesion but to one side of it; for a small lesion, the act of cutting through it will destroy some of the lesion. Embedding the two slices on this cut surface will result in more tissue being lost to facing up. In cases of doubt it is better to leave the lesion intact and use levels to cut into it. A note in the description can alert the reporting pathologist to this need.
|
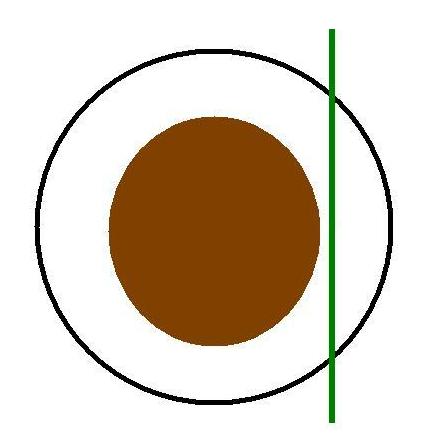
The diagram illustrates the top surface of a punch biopsy that bears a lesion. The green line depicts where the specimen could be divided asymmetrically into two pieces. Technically speaking this is not bisection because the two resulting pieces are not of equal size.
|